
Technical Requirements for Phishing
Anatomy of an Attack
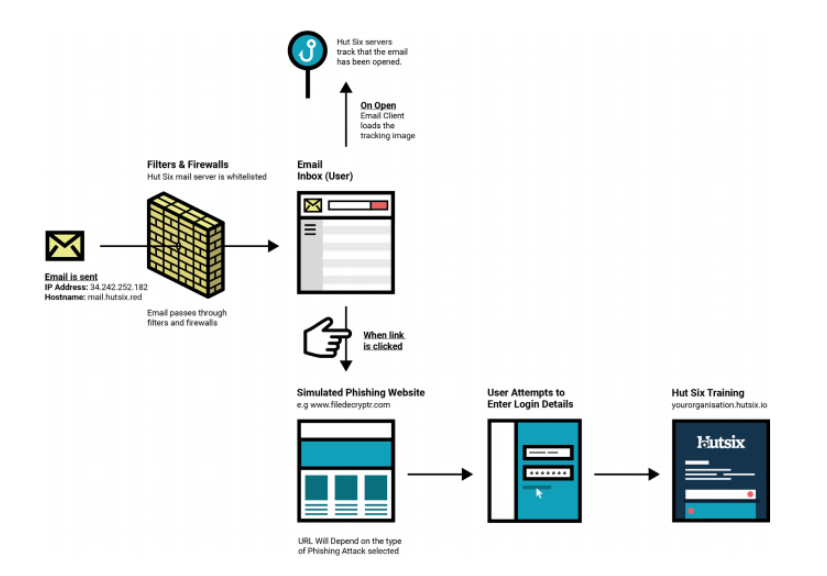
To understand what changes are required to your technical set-up, it is important to first understand how a Simulated Phishing Attack works. The diagram below shows the process of an attack:
Target Domains
Hut Six must confirm that any prospective client is the owner of their domain(s), the “Target Domain(s)” before sending any simulated phishing emails to email addresses of that domain.
This is achieved by providing you with a unique verification code that must be added to the Domain Name Service (DNS) records of your domain.
Once complete Hut Six then verifies this addition of a DNS record and allows simulated phishing emails to be sent from Hut Six to your domain.
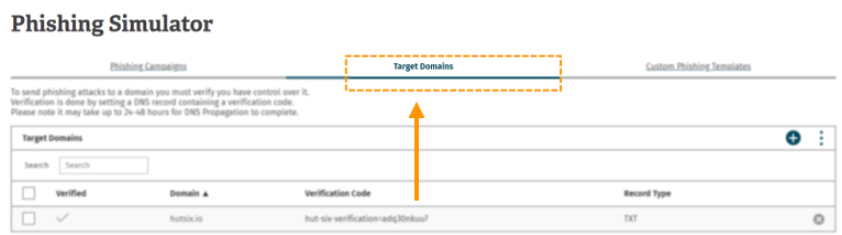
We will walk through this process by demonstrating the addition of the domain “hutsix.red” First you need to click on the ‘Target Domains’ tab from the phishing simulator home page.
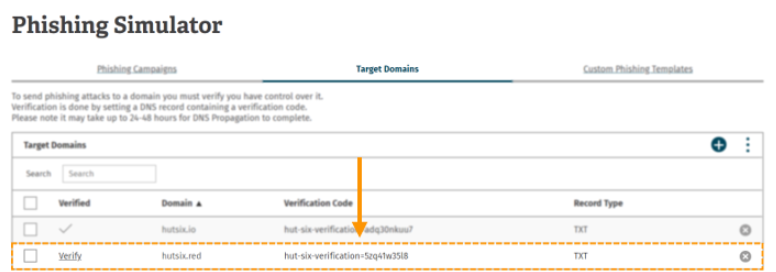
This will present you with the following table:
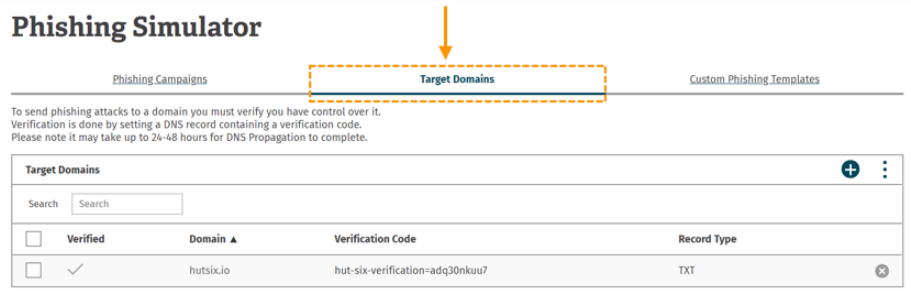
The ‘Target Domains’ table allows you to add, verify and remove domains which you intend to send simulated phishing emails to.
Adding the domain
Adding a domain can be done by clicking the (+) button in the top right of the table:
Clicking this button will present you with a dialogue box prompting you to enter a domain name. In our example we intend to verify the ‘hutsix.red’ domain. Once the domain has been entered, click “add"
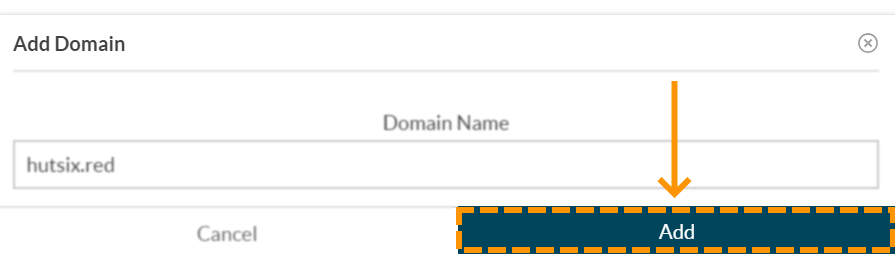
Your domain will now appear in the ‘Target Domains’ table with a corresponding verification code
Verifying the domain
To verify the domain you will need to add a TXT DNS record to your domain in the following format:

where the verification code is the unique code found in the target domains table.
In Amazon’s Route 53 DNS web service this is done by selecting your domain in the hosted zone section. The TXT record can be added by selecting the ‘Create Record Set’ option. The following sample record set depicts how to enter the respective information to correctly set the DNS record:
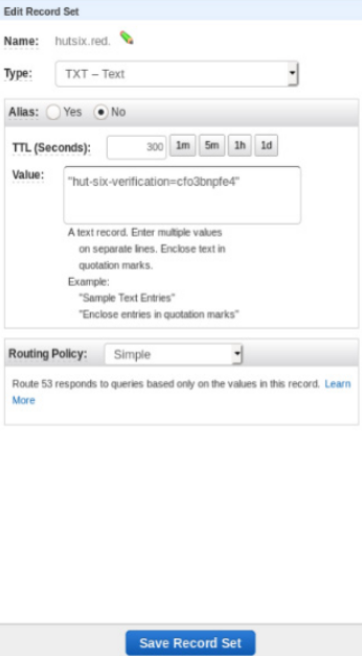
Other DNS web services may vary from Route 53 therefore you should contact your domain registrar or web hosting service for details on how to complete this step.
Once you have successfully added the verification code to your DNS you will need to return to the ‘Target Domains’ table and click the (verify) button next to your domain.
If you have added your DNS record correctly the verify button will now be replaced with a (✔)
IF YOU DO NOT RECEIVE A (✔) AFTER CLICKING (Verify) OR YOU RECEIVE AN ERROR MESSAGE YOUR DOMAIN IS NOT VERIFIED AND YOU WILL NEED TO CHECK THAT THE DNS RECORD WAS ENTERED CORRECTLY
Deleting a Domain
To delete a domain, you will need to locate the required domain in the target domains table and click the (x) icon at the extreme right of the table row.
You will then be presented with a deletion confirmation dialogue box that will prompt you to confirm the domain that you wish to remove:
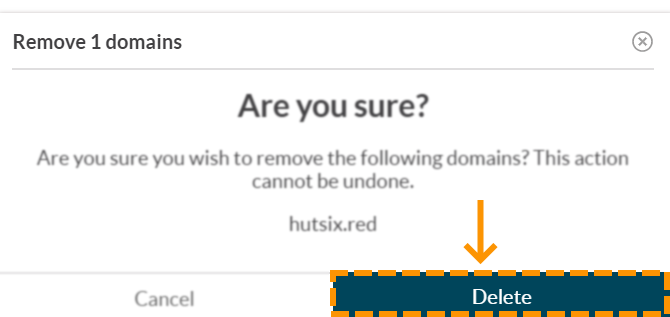
Clicking delete at this stage will remove your domain.
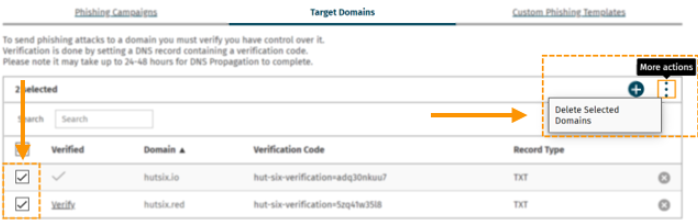
It is also possible to remove several domains at once by selecting multiple check boxes beside each domain in the “Target Domains” table and selecting the ‘Delete selected domains’ button from the more actions button in the top right of the table.
Allowing the Simulated Phishing Attacks through to your Users (Whitelisting)
In order to ensure that simulated phishing attacks reach your users, you will need to add exceptions to any firewalls and/or web filters that your organisation operates.
If you are unsure how to make any of these changes after reading this guide, please contact support.
Best Practices & Recommendations for Whitelisting
Test Changes in a non-Production Environment
If possible, test any changes to your firewalls and filters in a separate testing environment, where users will not be affected by any misconfiguration, before deploying those changes to “Production”.
Run a Limited Test
Once you have completed the whitelisting process, run a test campaign against a couple of users to make sure that the simulated phishing emails get through to their inbox.
DMARC
This section only applies if you are whitelisting by a means other than by IP address.
Allowing simulated phishing emails through to your employees can open the door to genuine phishing emails if you are not careful. You should ensure that your email service still checks that the simulated phishing emails genuinely came from Hut Six. This is achieved through a technology standard called DMARC.
DMARC enables Hut Six to instruct your mail servers to mark any emails that are not from the Hut Six mail servers as spam. However, it is up to your mail servers to ensure that this is carried out. Be careful not to disable the DMARC check when whitelisting the simulated emails because that may allow attackers to spoof email sender addresses.
Remove whitelisting when not needed
You can further minimise any risk of genuine phishing emails by removing the whitelisting once a simulated phishing campaign has concluded.
Over-whitelisting
Do not add more entries to your whitelist than are strictly necessary. If you believe that you have made the necessary changes listed in this guide and phishing emails are still getting caught by your spam filter then please contact Hut Six for support rather than making more changes
Whitelisting Simulated Phishing Emails
We recommend that you whitelist the Hut Six Mail Server using its IP address. Please use the details listed in the table found below:
| IP Address | 34.242.252.182 |
|---|---|
| Hostname | mail.hutsix.red |
Whitelisting Simulated Phishing Website Content
The simulated phishing websites require JavaScript to function. If your organisation operates a Web Content Filter, then you will need to ensure that the domains used in any Simulated Phishing Attack are whitelisted.
The table below lists all the standard domains used in a typical phishing simulation:
| Simulated Phishing Website Domains |
|---|
| antivirus-management.com |
| dshbrd.xyz |
| careerprofile.social |
| filedecryptr.com |
| internal-network.com |
| intranet-page.com |
| mailpush.link |
| mitiguard.net |
| outbound-mail.net |
| pensionparrot.com |
| saleshost.com |
| share-a-file.com |
| smarterhome.world |
| wwwdocument.com |
| yippie.services |
More domains will be added in the future. Please note that subdomains of the listed domains are also used (eg. www.dshbed.xyz), so ensure that these subdomains are permitted.
The domains can be whitelisted as and when a phishing campaign is due to take place – allowing the client to only whitelist the domain that they will be using.
Enjoyed using our product?
Help us out by leaving a review for on Gartner Peer Insights!
It only takes 5 minutes of your time and every review helps us immensely to reach new clients. Thank you so much.