
SSO with AD Federation Services
Important Information & Prerequisites
Your service with Hut Six Security has had SAML-based Single Sign-on (SSO) enabled. Before beginning, please ensure your corporate network is setup inline with our requirements, set out below:
You must be running a corporate network with Active Directory installed on a server running at least Windows Server 2012 R2 – we recommend Windows Server 2019 which will include the latest security and stability updates.
Active Directory should be setup on a domain that you have full control over, for example, ‘hutsix.io’.
Within your domain environment, your corporate network must have Active Directory Federation Services (ADFS) 3.0 or higher installed on a server running at least Windows Server 2012 R2. We only support the SAML, version 2.0 authentication protocol within ADFS.
Your ADFS server should be accessible by a subdomain on the Wide Area Network over HTTPS.
We will provide the necessary certificates for the Relying Party Trust.
You must download the Federation Metadata XML file in order to setup the Relying Party Trust within ADFS. To
download the Federation Metadata XML file, follow the instructions below.
- On the Single Sign-on management page within the Hut Six Security control panel, click ‘Download Federation Metadata’. Please note that this will be valid for 24 hours.
The Federation Metadata XML file will include our certificate used for verifying digital signatures on requests. This certificate will be renewed annually, so you must ensure that you have our up-to-date certificate within the Relying Party Trust within ADFS. You can download an up-to-date copy of our certificate within the Hut Six Security control panel.
Preparing ADFS
If your corporate network is setup inline with our requirements, you should create a Relying Party Trust within ADFS as set out below. The instructions provided here are for ADFS 3.0 on a server running Windows Server 2016.
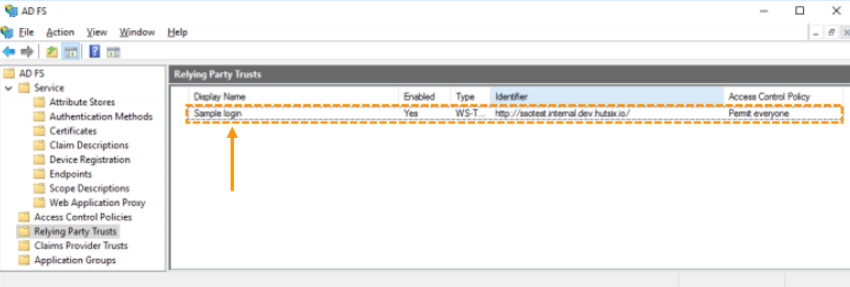
- In the ADFS management console, select ‘Relying Party Trusts’ in the navigation. You should see a screen similar to below, with any other Relying Party Trusts you have created shown in the list.
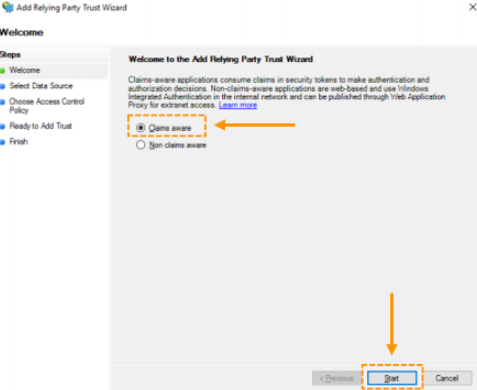
- Click on ‘Action’ in the menu bar, followed by ‘Add Relying Party Trust’. In the window that appears, you should choose ‘Claims aware’, and then click ‘Start’ to start the wizard.
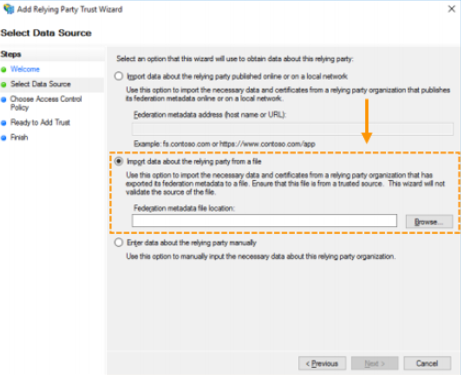
- Select ‘Import data about the relying party from a file’, and then choose the Federation Metadata XML file you downloaded earlier, and then click ‘Next’ to continue.
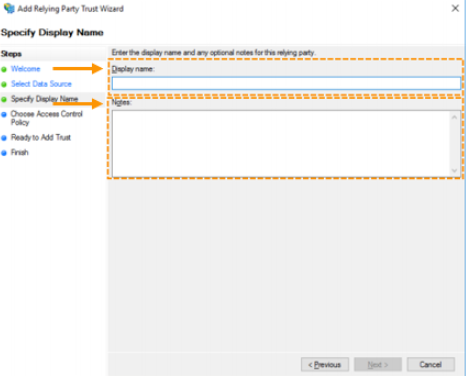
- Choose a display name and optional notes, and then click ‘Next’ to continue
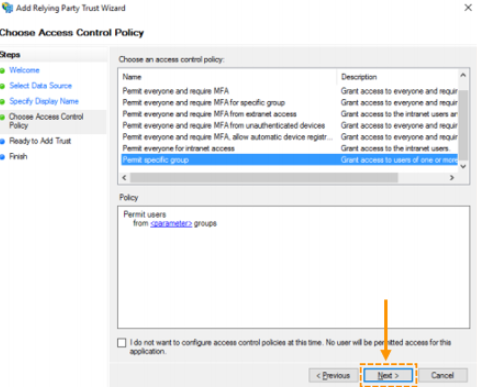
- ADFS is responsible for controlling access to our system, based on an Access Control Policy, configured on this step (this can also be configured later if requirements change).
The default Access Control Policy is ‘Permit everyone’, which permits everyone who successfully authenticates, access to our system; however, we don’t recommend that you choose this Access Control Policy for security reasons.
The most likely Access Control Policy that will be applicable is ‘Permit specific group’ – allowing you to restrict access by Active Directory group membership. Choosing this Access Control Policy as an example, clicking on ‘
Click ‘Next’ to continue.
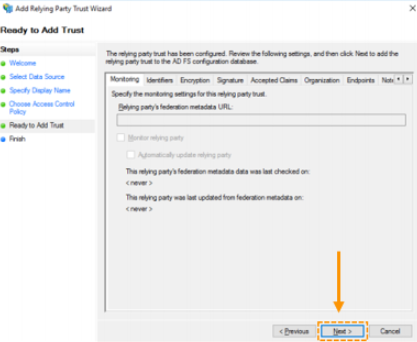
- At this step, the Relying Party Trust is ready to be added. All other necessary configuration that would normally be manually carried out here has been provided in the Federation Metadata XML file. Click ‘Next’ to create the Relying Party Trust, followed by ‘Close’ to finish the wizard.
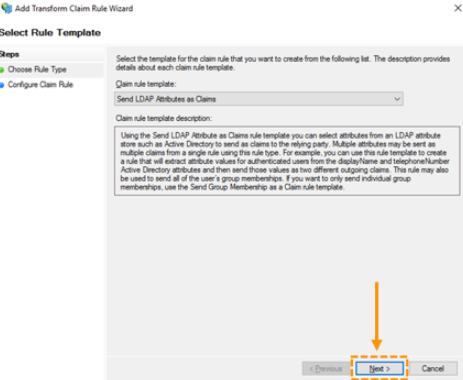
- The ‘Edit Claims Issuance Policy’ window will appear. Click on ‘Add Rule’.

- In the window that appears, ensure that ‘Send LDAP Attributes as Claims’ is selected under ‘Claim rule template’, and then click ‘Next’ to continue.
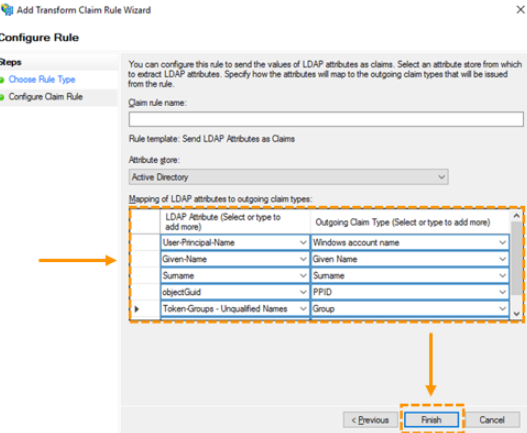
- Choose a name for the claim rule and ensure that ‘Active Directory’ is selected under ‘Attribute store’. Under ‘Mapping of LDAP attributes to outgoing claim types’, complete the mapping table as below (some of the options may not be in the list, so you may need to type those manually).
You will also need to parse ‘User-Principal-Name’ as ‘NameID’, not shown in the diagram.
Click ‘Finish’ to finish the wizard, followed by ‘OK’ to close the ‘Edit Claims’ window.
- ADFS has now been prepared for use with SAML-based Single Sign-on on your service. Please follow the instructions on the ‘Single Sign-on (SSO’ page on your service in the Hut Six Security control panel to configure your service to interface with ADFS.
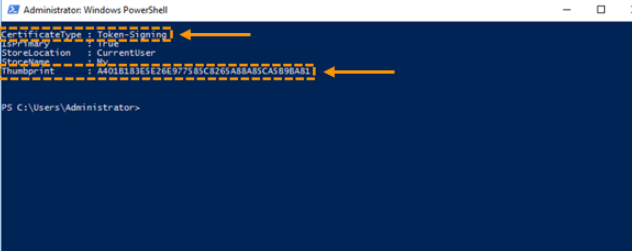
Get ADFS Certificate Fingerprint
The ADFS certificate fingerprint is required for verifying authentication responses from your ADFS Identity Provider (IdP). ADFS automatically configures a new certificate when installed, and to get its fingerprint, follow the instructions below.
- Open a new Windows PowerShell prompt, elevated as an administrator, and run the command ‘Get-AdfsCertificate’.

- After the above command is run, a list of certificate fingerprints will appear. The certificate fingerprint needed to set up Single Sign-on (SSO) is the one with a ‘CertificateType’ of ‘Token-Signing’, and is the data next to ‘Thumbprint’.
Logging In
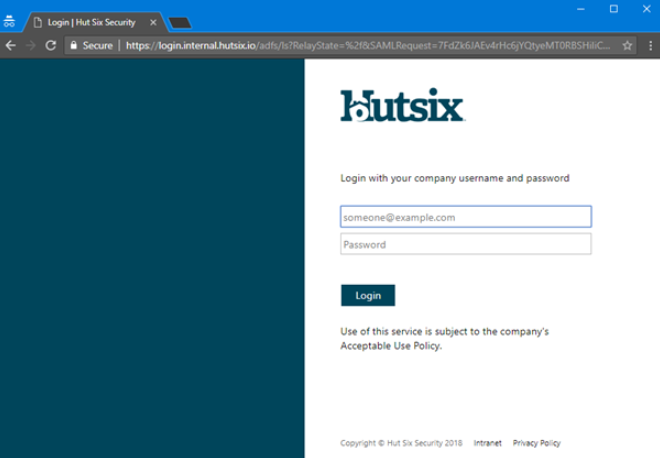
- To login, navigate to your customers login page. For example, abc.hutsix.io. Once Single sign-on (SSO) has been enabled, depending on the preference selected, you will either be automatically redirected to your Single Sign-on (SSO) login page, or will be presented with the normal login page, as shown below. If you have been presented with the normal login page, you should click ‘Login with your organisation’.

- The Single Sign-on (SSO) login page will vary by organisation, but for ADFS, will likely look something like this:
- You should login according to your organisations requirements and the settings you configured in the Hut Six Security control panel. Upon successfully authenticating, you will automatically be redirected to the dashboard as if you were logging in as a normal user. You will not be able to cross-login between authentication methods.
Enjoyed using our product?
Help us out by leaving a review for on Gartner Peer Insights!
It only takes 5 minutes of your time and every review helps us immensely to reach new clients. Thank you so much.