
Automatic User Provisioning with SCIM
The System for Cross-domain Identity Management (SCIM) is a mechanism by which users & groups from an authoring directory service, such as Azure Active Directory, can be synchronised to another platform, such as the Learning Management System, for use on that platform.
When SCIM is active for the Learning Management System, we will be provided with real-time updates to your users & groups, so if a users’ name changes within Azure Active Directory, this should be reflected in real-time or soon after in our platform. Passwords and other secure data are not synchronised, so users shall still be required to set a password on our platform. Alternatively, you can configure Single Sign-on (SSO) in addition to or instead of SCIM.
This guide will cover the necessary configuration steps for configuring SCIM for Azure Active Directory.
Configure the LMS
The first step is to configure the Learning Management System to accept SCIM queries. You will need to login to the Learning Management System as a super-user.
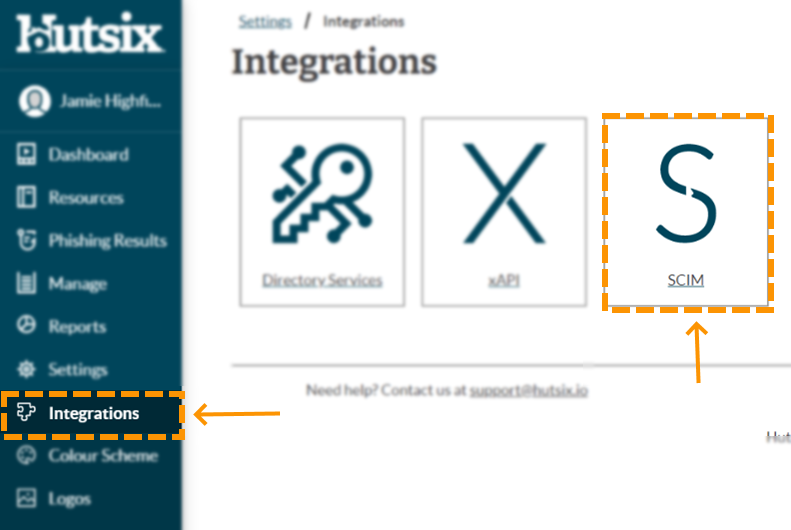
- From the Dashboard, in the left navigation, choose Settings and then Integrations.
- Choose SCIM to open the SCIM configuration options page.
- Make a note of your Tenant URL, which is listed in the banner across the top – you’ll need this later.
- The Operation Mode defines whether users and groups that are synchronised from Azure AD, are created on the Learning Management System. Under Operation Mode, choose Dry-run mode if you wish for users and groups to not be created. This is useful if you want to ensure that the correct scope of users and groups are being synchronised before being created. Alternatively, choose Sync mode to automatically create users and groups when they are synchronised. All users and groups that are synchronised under Dry-run mode are marked as pending and will be processed when you switch to Sync mode.
See step 4 for instructions on how to view audit logs on Azure AD.
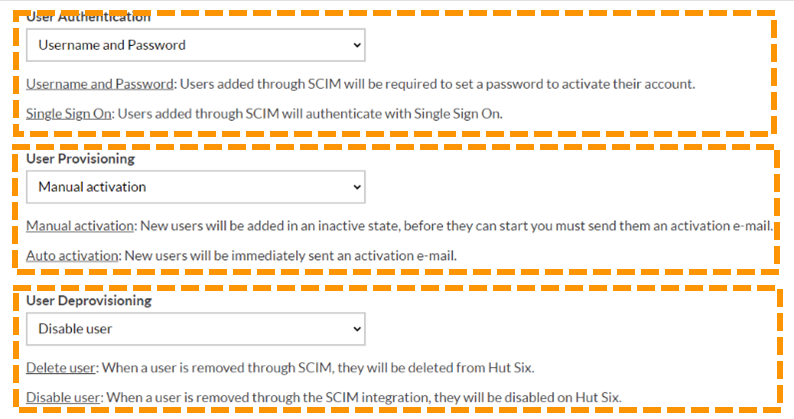
- Users in the Learning Management System can authenticate in one of two ways – either using a username and password, or by using Single Sign-on (SSO). Under User Authentication, you can choose which authentication method you would like to use. If you choose Single Sign-on (SSO), you must configure SSO accordingly.
- Under User Activation¸ choose whether newly created users by SCIM should be automatically activated or not. If you choose Manual Activation, then newly created users by SCIM will not be able to sign-in straight away. If in step 4, you chose Single Sign-on (SSO) as the authentication mechanism, users will always automatically be activated.
- Finally, under User Deprovisioning, choose the behaviour for when a user is deleted from Azure Active Directory. You can either choose Disable User or Delete User. If you choose Delete User, then the user will be permanently deleted.
Authentication
The second step is to configure the authentication. You will need to generate an authentication token, that will be configured in Azure Active Directory later. This ensures that SCIM messages are authentic and only coming from your Active Directory.
- From the SCIM configuration page in the previous step, under Authentication, click Generate SCIM Token.
- You will be prompted to choose an expiry date for the token. This is a security mechanism to reduce the chances of token mis-issuance. We recommend you choose an expiry date of no longer than 1 year, which is the default.
- Click Generate Token, which will generate a new authentication token.
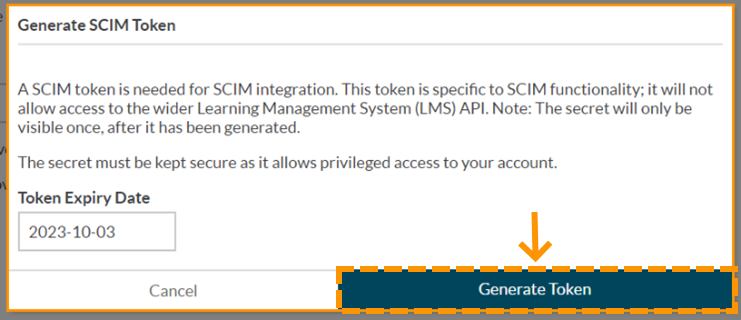
- The authentication token will be created and displayed. Make a note of this securely, as it cannot be retrieved again. If you lose your authentication token, you can revoke it and generate a new one at any time from the same place.
Create an Enterprise Application in Azure AD
The second step, as with Single Sign-on (SSO) integration with Azure Active Directory, you need to create an Enterprise Application.
- From the Azure Portal, open Azure Active Directory. This can be found if it is visible under Azure Services from the dashboard; otherwise, it will be available by searching.
- Select Enterprise applications in the left navigation. This will list all enterprise applications that have been created within your organisation.
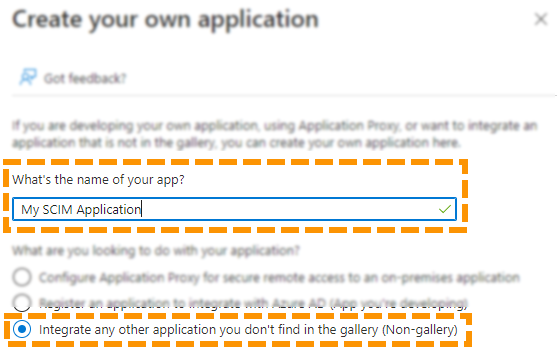
- Select New application followed by Create your own application. This will bring up the configuration panel to create a new custom enterprise application.
- Choose an appropriate name for this enterprise application and ensure Integrate any other application you don't find in the gallery (Non-gallery) is selected. This enterprise application will act as a basis for SCIM integration with our platform.
- Click Create to complete the creation of the enterprise application.
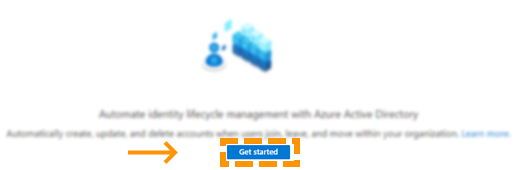
- In the left pane, under Manage, select Provisioning. This is the main configuration area for SCIM within Azure Active Directory. You may be shown a prompt like below. If you are, you should click Get started.
- Under Provisioning Mode, ensure Automatic is selected.
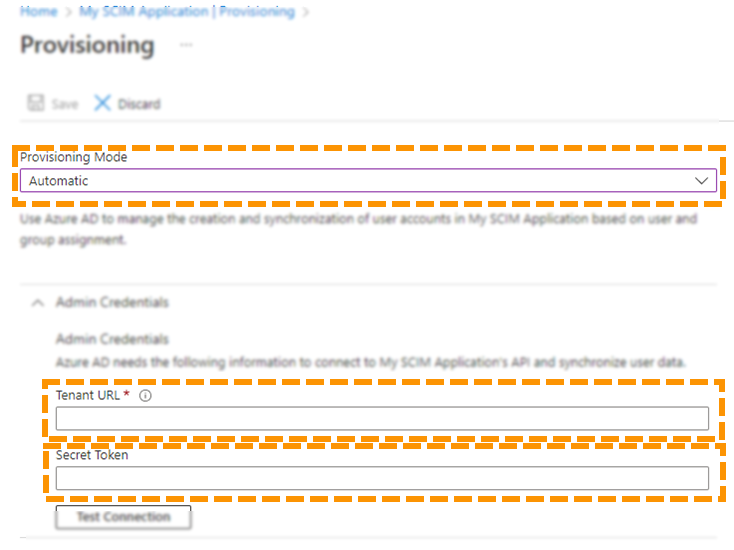
- Under Tenant URL, enter the tenant URL that you saved from the Learning Management System earlier.
- Under Secret Token, enter the authentication token that you saved from the Learning Management System earlier.
- Optionally test the connection by clicking Test Connection, and then click Save to save the configuration.
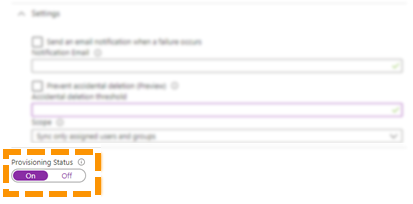
- Under Provisioning Status, ensure On is selected and then click Save to confirm changes.
- Finally, you need to specify which users and groups will be in scope for this SCIM configuration. From the main application configuration page, in the left pane, under Manage, click Users and Groups.
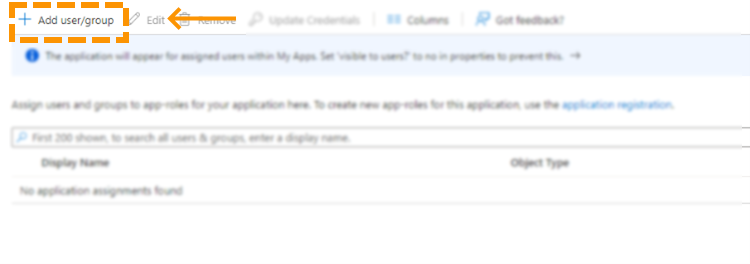
- Click Add user/group to add a new user or group to the scope.
- Under Users and Groups, click None Selected and follow the instructions to add a user or group.
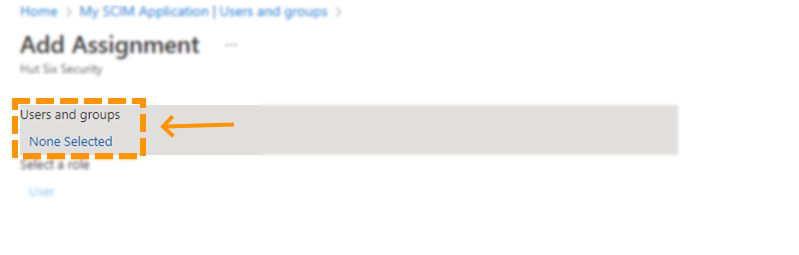
- Finally, click Assign to add the user or group to the scope.
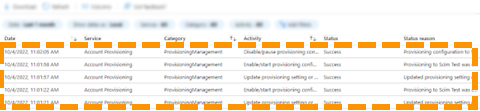
View Audit Logs on Azure AD
When in Dry-run mode, you may wish to view the audit logs within Azure AD to ensure that the correct scope of users and groups are being synchronised.
- Open the main configuration page for the enterprise application previous created.
- In the left pane under Manage, choose Audit Logs.
- A comprehensive list of SCIM synchronisation messages will be logged here for review.
SCIM will now be configured between Azure AD and the Learning Management System. If in step 1, you enabled Dry-run mode, be sure to turn this off when you are satisfied that Azure AD is configured according to your requirements. Users and groups that have been synchronised from Azure AD to the Learning Management System when in Dry-run mode will be created when Dry-run mode is turned off.
Conclusion
You have now configured your SCIM integration.
Enjoyed using our product?
Help us out by leaving a review for on Gartner Peer Insights!
It only takes 5 minutes of your time and every review helps us immensely to reach new clients. Thank you so much.