
SSO with Shibboleth
In your Shibboleth root installation directory, navigate to the ‘metadata’ folder, and create a new XML file. This will store the Learning Management System’s metadata, so name it accordingly.
Download the Learning Management System’s metadata from the ‘Directory Services’ section under ‘Settings’ in the Learning Management System. This will be available under the ‘Information’ tab.
In your Shibboleth root installation directory, navigate to the ‘conf’ folder, and open the XML file called ‘metadata-providers.xml’. Create a new ‘FilesystemMetadataProvider’, as shown below. Currently, we do not support ‘HTTPMetadataProvider’ and ‘FileBackedHTTPMetadataProvider’.
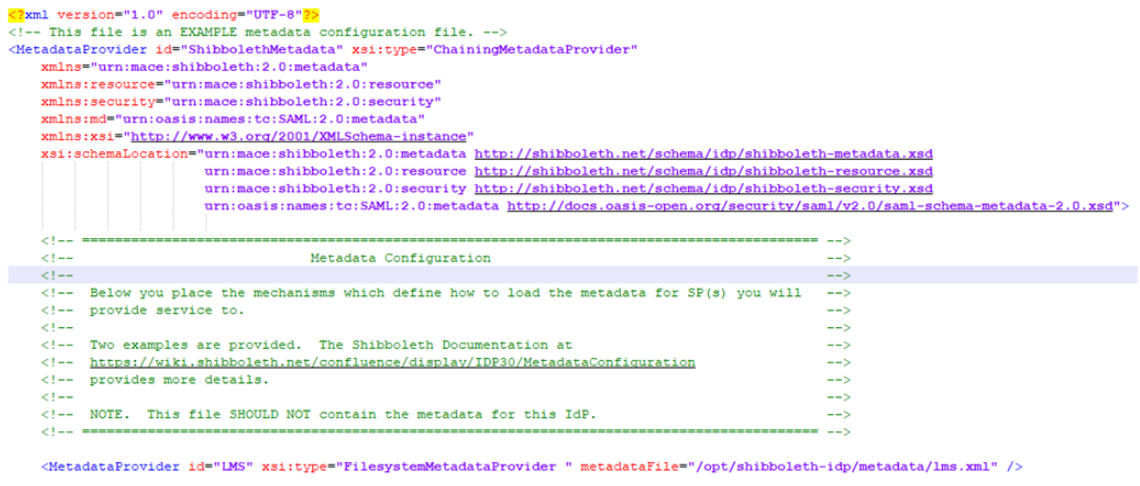
Once the entry has been created, add the ‘metadataFile’ attribute, giving the full path to the metadata file.
- In your Shibboleth root installation directory, navigate to the ‘conf’ folder, and open the XML file called ‘relying-party.xml’. Within the relying party overrides section, create a new entry for the new relying party between Shibboleth and the Learning Management System.

The value for ‘c:relyingPartyIds´ should take the form of your domain to access the Learning Management System. Technically, only the first ‘bean’ with a parent of ‘SAML2.SSO’ is required. We do not support SAML Single Log Out (SLO) nor do we use SAML ECP.
- In your Shibboleth root directory, navigate to the ‘conf’ folder, and open the XML file called ‘attribute-resolver.xml’. Within the attribute resolver section, create a new entry to define the attributes that should be resolved for the Learning Management System. These resolutions link directly to LDAP attributes – if these LDAP attributes have already been resolved, then technically, they do not need resolving again. However, we have done so here for the sake of readability.
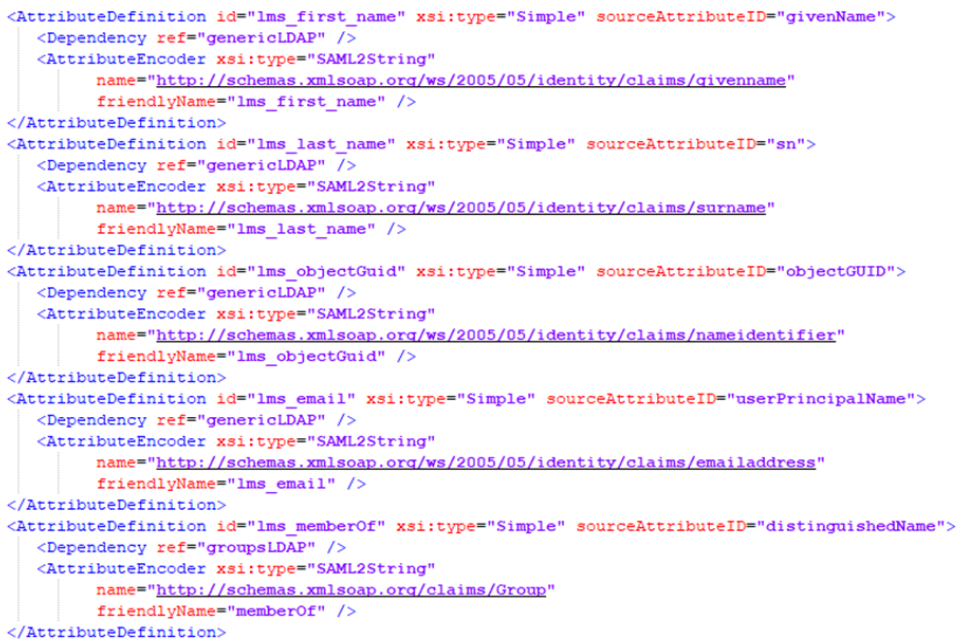
All the source attribute IDs shown above are required, except for the last entry, which is responsible for providing group information. If you wish to provide a list of group membership as part of the SAML authentication flow, then the last entry shown above is necessary. If you do not already have a mechanism for getting groups within Shibboleth, we recommend adding an additional ‘DataConnector’ in the same file, at the bottom.

This data connector is referenced in the last attribute resolution entry above, in the ‘Dependency’ element. This approach currently provides group membership information for a user in the form of a Distinguished Name, rather than the SAMAccountName; however, these groups can be linked to groups and other permissions within the Learning Management System using group mappings.
- In your Shibboleth root directory, navigate to the ‘conf’ folder, and open the XML file called ‘attribute-filter.xml’. Within the attribute filter policy group section, create a new entry to indicate which resolved attributes should be released as part of the SAML authentication flow.
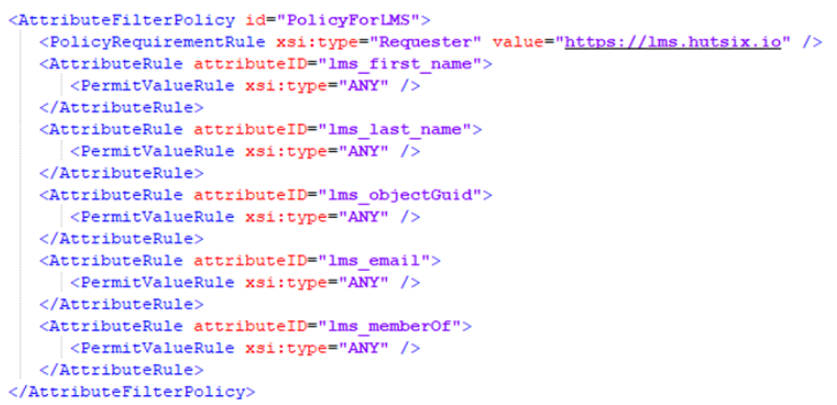
The attribute ID for each attribute rule should correspond to the attribute ID defined as part of the attribute resolution process. The ‘Requester’ at the top of the attribute filter policy should take the form of your domain to access the Learning Management System.
- In your Shibboleth root directory, navigate to the ‘conf’ folder, and open the XML file called ‘saml-nameid.xml’. In this file, a persistent name ID generator should be configured that should take a base 64 value of the LDAP ‘objectGuid’ attribute.

The value for ‘c:candidates´ should take the form of your domain to access the Learning Management System.
- Restart your Shibboleth server for the configuration to take effect. This might be by restarting Jetty or Tomcat, or whichever Java Servlet container you are using.
Enjoyed using our product?
Help us out by leaving a review for on Gartner Peer Insights!
It only takes 5 minutes of your time and every review helps us immensely to reach new clients. Thank you so much.